How to Choose a Reputable Power Washing Company You Can Trust

It’s important to do your research before choosing a power washing company. Start by asking friends and family members for recommendations.

Professionals should also be licensed and insured. Additionally, they should use only professional-grade equipment and supplies. They should also be water restriction compliant, as water is a limited resource. Go to https://www.certifiedsoftwash.ca/ for more details.

Check Their Reputation

Power Washing

The first step in finding a reliable power washing company is to check their reputation. This can be done by contacting past customers or looking for online reviews. You should also ask if they offer different services, such as pressure washing, soft cleaning, or steam cleaning. This will help you narrow down your options and find the right one for your needs.

You should also look for a company that is licensed and insured. This will protect you in case of any accidents or damage during the cleaning process. A reputable company will have no problem providing proof of insurance and licensing upon request.

Finally, make sure the power washing company uses professional-grade products and equipment. This is important because you don’t want a company to use consumer-grade supplies that could damage your home’s exterior or lead to health issues. A good power washing company will only use industry-standard cleaning solutions that are safe for your property and the environment.

A reputable power washing company will take the time to understand your unique needs and provide you with a quote based on those requirements. They should also be able to explain the difference between their services, such as how power washing differs from soft washing and what surfaces can be cleaned with each method.

When selecting a power washing company, be sure to check their customer service and reliability. This is important because you will be dealing with them on a regular basis until the job is complete. Ask about their scheduling, communication methods, and whether they provide a guarantee on their work. You should also be aware that prices vary from company to company and that the lowest price may not always mean the best quality. A good company will provide competitive pricing without compromising on the quality of their services. This will ensure that you are getting the best value for your money. They should also offer a free estimate and customer satisfaction guarantee.

Check Their Insurance

When choosing a power washing company, it’s important to look for one that is insured and licensed. This will protect you in case something goes wrong during the cleaning process, and it also demonstrates their commitment to professionalism. Additionally, it’s important to find out whether or not they use environmentally-friendly practices, as this is a major concern for many homeowners and businesses. A reputable company like EcoTek Power Wash is fully committed to environmental responsibility and utilizes green detergents and modern equipment that reduces energy consumption and waste.

You should also find out what type of cleaning methods they use for different surfaces. Power washing is a great way to remove built-up grime and dirt, but it can be damaging to certain materials if it’s not used properly. Make sure to find out if they offer soft washing, which is a low-pressure cleaning method that can be used on delicate surfaces without causing damage.

Finally, you should check to see if they offer a customer satisfaction guarantee. This is a good indication of how confident they are in their work and will give you peace of mind that you’ll be happy with the results.

Choosing a power washing company requires a bit of research on your part, but it’s worth it in the end to find a company that you can trust with your home or business. By following these tips, you’ll be able to choose a company that will provide high-quality cleaning services and will leave your outdoor surfaces looking brand new. Don’t be afraid to ask questions and compare prices, but be wary of extremely low prices, as this can often indicate poor service quality.

Check Their Experience

A power washing company’s experience is a vital factor to consider. You don’t want to hire someone who is just learning how to use this equipment and may damage your property. Look for a company with years of experience cleaning a variety of surfaces and properties. This will help you avoid costly mistakes and ensure that the job is done right.

In addition to asking for references, ask the power washing company about their process and how they clean different surfaces. For instance, some companies utilize the power wash method while others use soft washing techniques to safely and effectively remove dirt, mildew, mold, and stains from different surface types. You should also ask the power washing company about the chemicals they use and why they choose these specific products for different surfaces.

Also, find out if the company is licensed and insured. This is important because it protects you in case of any work-related accidents and shows that the power washing company is committed to professionalism and safety.

You should also check whether the company offers a customer satisfaction guarantee. This will give you confidence that they are confident about their abilities and services. A reputable power washing company will display this on their website and social media platforms to show potential customers their commitment to customer satisfaction and high-quality results.

Besides removing dirt, mildew, mold, and other contaminants from surfaces, power washing can also help extend the life of your deck, patio, driveway, walkways, and roof. Regular power washing is recommended to maintain the value of your home and make it safe for your family. In addition, it will prevent moisture from damaging your property and causing serious structural problems. If you are planning to repaint your house, frequent washing will prepare the exterior of your house for paint. Moreover, a well-maintained house will attract potential buyers and increase your property value. Therefore, it’s crucial to include power washing in your yearly cleaning routine. To find a reputable and reliable power washing company, do some research online and ask for recommendations from friends and family.

Check Their Pricing

A good power washing company can remove mold, mildew, grime, dirt, and other debris from the exterior of your property and make it look like new. Power washing is a quick and effective way to clean concrete, brick, wood, asphalt, tile, siding, driveways, walkways, roofs, pools, decks, and more. However, it’s important to choose a contractor that you can trust. There are many things you should keep in mind when choosing a power washing contractor, such as their reputation, insurance coverage, and pricing.

A reputable power washing company will have a positive online presence with many reviews and testimonials. Make sure you check these reviews before hiring a company. Also, ask for referrals from friends and family members. A referral from a trusted source can help you avoid a bad experience with a company.

Lastly, it’s crucial to find out if the company offers free estimates and competitive prices. Be wary of companies that offer extremely low prices, as this may indicate a lack of experience or subpar equipment.

In addition, a good power washing company will be licensed and insured to protect their clients and ensure they are working within the law. They should also be committed to environmentally responsible cleaning methods and use high-quality equipment designed to reduce water and energy consumption. A reputable power washing company will also be transparent about their process and provide customers with a customer satisfaction guarantee.

Power washing is a necessary step in preserving your home and increasing its value. A well-maintained house is attractive to potential buyers, and regular power washing can remove moss, dirt, algae, and other contaminants that can damage your home’s paint. In addition, power washing can help eliminate the build-up of pollen, which can trigger allergies and asthma. A professional power washing company can also clean outdoor furniture, mailboxes, and kid’s outdoor play areas to make your property look its best.

Posted in Power Washing | Tagged , , , , | Comments Off on How to Choose a Reputable Power Washing Company You Can Trust

Refinishing Cabinets in Occupied Homes – Tips for Minimal Disruption

Cabinet Refinishing Modesto

Cabinet Refinishing Modesto is a popular option for homeowners looking to give their kitchens a new look. It’s an environmentally friendly option that keeps the existing structure of the cabinets but allows you to change their aesthetic.

Refinishing your cabinets typically involves sanding and repainting. It can be a messy job that requires some time commitment.

1. Keep the Area Clean

Refinishing is the process of sanding down cabinets and applying a new stain or paint. It can dramatically change the look of a kitchen without having to replace any of the cabinet components. However, the refinishing process is labor-intensive and messy.

There are a few things homeowners can do to minimize the amount of dust produced by the sanding and painting process. First, they can cover the floor with a drop cloth. This will help to trap the majority of the dust. Next, they should vacuum or mop the floor regularly to remove any loose dirt particles. Finally, they should use a dehumidifier in the room to reduce excess moisture.

When it comes to cleaning refinished cabinets, it’s important to know what type of cleaner is safe for them. Using the wrong cleaner on your cabinets can cause damage that is permanent. The best cleaners are mild dish soap and water or a pH-neutral cleaner like Bona.

It’s also important to avoid rubbing your cabinets with steel wool or other abrasive materials. These can create micro-scratches in the finish. If you notice a scratch, use a furniture touch-up marker that matches your cabinets to color over it. Additionally, avoid silicone-based polishes as these can create a waxy build up that interferes with future touch-ups. By following these simple steps, you can protect your investment and ensure that your cabinets last for years to come.

3. Keep the Noise to a Minimum

The sanding process that’s required to refinish cabinets can cause some noise. However, there are steps that can be taken to limit the amount of disturbance you experience during this time. For example, your painting contractor should sand all doors before beginning to stain so that they’re smooth and free of bumps and grooves. This also helps ensure that the new finish will last as long as possible.

In addition, you can ask your contractors to use low-pitch equipment and keep their conversations to a minimum. This will help limit the level of noise that echoes in your home. You can also invest in sound-reducing cabinets made of more dense materials. These will help to reduce the reverberating sounds that naturally occur in large rooms like homes along Littleton Road and Troy Hills.

Refinishing your cabinets can dramatically change the look of your kitchen without the cost and disruption associated with replacing them. It’s also a more environmentally sustainable option than purchasing and transporting new cabinets. It minimizes the number of trees that need to be cut down for new cabinetry and reduces fossil fuel consumption.

4. Turn Off the Water

Refinishing involves sanding and applying new stain or paint to existing cabinetry, allowing homeowners to achieve a dramatic change in color without replacing doors or drawer fronts. On the other hand, refacing replaces old doors and drawer fronts, giving homeowners a whole new look with updated styles, finishes, and materials. Ultimately, the best solution for NYC homes depends on individual tastes and needs. A professional evaluation can help clarify what is possible for your home.

Many local homeowners struggle with recurring water damage problems in their cabinets. Whether bubbling or warping, this occurs when moisture sits for too long without getting a chance to dry. By stripping down and sealing surfaces properly, professionals can prevent moisture from seeping back through again, especially in humid summers in Baton Rouge.

Posted in Cabinet Refinishing | Tagged , , , , | Comments Off on Refinishing Cabinets in Occupied Homes – Tips for Minimal Disruption

Top Pest Prevention Tips For Homes

Pests are attracted to food, water and shelter. They can cause health problems, including disease transmission, aggravate allergies and asthma, and damage homes and buildings.

Ben’s Pest Control starts with recognizing the signs of an invasion. These include ant trails, rodent droppings, greasy stains, shed wings and other indicators of an infestation.

Keep Your Home Clean

Keeping your home clean is one of the best things you can do to prevent pests. Pests thrive in dirty environments, and consistent cleaning disrupts their breeding habits and makes the environment unwelcoming. You should sweep and vacuum regularly, wipe down surfaces, and empty and wash pet food dishes. You should also store food in airtight containers and take out trash frequently.

Cluttered spaces also provide hiding spots for pests, and they serve as potential nesting sites. Getting rid of piles of paper, wood, and plants prevents them from becoming pest habitats.

Seasonal changes also impact the kinds of pests that are a problem for homeowners. For example, cockroaches are more prevalent in fall and winter, while spiders and ticks tend to pop up during summer. A pest prevention plan that addresses the needs of each season will reduce the risk of pest infestation.

Moisture is another common factor that leads to pests. Leaks, clogged drains, and standing water are all attractive to pests. Be sure to check the basement, attic, and garage for moisture-loving pests and address any issues promptly.

Pests can also enter the home through cracks and crevices. Seal any gaps with caulk, especially around utility pipes and the places where walls meet. You should also replace worn weather stripping and replace or repair damaged window screens.

Aside from sealing entry points, you can deter pests by keeping the yard and gardens trimmed. This removes places for rodents to hide, and it reduces the likelihood that they will find a way to enter your home through the foundation or the crawl space.

It’s also a good idea to clean up and dispose of any rotting fruits, vegetables, or leaves in your yard and garden. You should also keep firewood away from the house, and make sure your gutters are clear of debris. Lastly, keep shrubbery and trees trimmed away from the house to avoid pests using them as hiding or shelter spots. It’s far easier and cheaper to perform these preventative maintenance tasks on a regular basis than to deal with a pest infestation later.

Use Natural Repellents

It’s no secret that pests are more than just a nuisance—they can damage your home, cause health issues and make your living conditions uncomfortable. From the sight of ants invading your kitchen to the sound of rodents chewing on wires in your walls, it’s no wonder that pest control is one of the most important aspects of homeownership. But if you don’t like the idea of spraying chemical pesticides around your house, or if the thought of eating food covered in pesticide residue makes your stomach churn, natural repellents may be just what you need.

Natural insect repellents are made from plant oils, such as lemon eucalyptus (OLE), citronella, geranium and peppermint, that are applied to skin or clothing to deter pests. These oil-based products interfere with insects’ ability to sense carbon dioxide and body heat, effectively deterring mosquitoes and other pests from approaching you. They also often have a pleasant aroma that humans find more appealing than the strong, sometimes toxic smell of synthetic repellents.

Because these products don’t have the same potency as synthetic bug sprays, they typically need to be reapplied more frequently. This can be a bit of a drawback for some homeowners who want to rely on them as their primary means of protecting themselves from pests, but it’s not uncommon for natural repellents to provide more than enough protection when used correctly.

Using natural repellents as part of a comprehensive integrated pest management (IPM) plan is ideal for those who want to minimize their use of pesticides in and around their homes. For homesteaders, gardeners and chicken-raisers who prioritize organic and sustainable practices, these nontoxic options are an excellent way to protect their families and their plants from bugs without compromising their lifestyles or the safety of their pets and livestock.

Remember, though, that just because these products aren’t as harsh as traditional pesticides doesn’t mean they’re safe to use around children or people with sensitive skin. Always read and follow the directions on any product you choose to apply to yourself or your family, and if you notice any allergic reactions, stop using that particular product immediately.

Seal Entry Points

Pests are drawn to homes for three primary reasons: food, water, and shelter. Tiny cracks, gaps, and holes provide them with easy access to these resources and can allow them to gain a foothold inside your home where they can cause damage, create an unhealthy living environment, and even pose health risks. Rodents chew through wires, leading to fire hazards, and cockroaches and ants spread diseases when they contaminate food or surfaces.

Proper home maintenance and inspections can help prevent infestations by closing off entry points. The most common entry points include windows and doors, vents, and utility openings. Checking these areas on a regular basis and using caulk and expanding foam to seal gaps can significantly reduce the chances of pests entering your home.

Crawl space vents that are open offer rodents a direct route to your basement or attic, and gaps around chimneys and skylights can also allow pests to enter your home. Checking these areas regularly and sealing them with caulk or metal flashing can prevent pests from getting into your home.

In addition, storing food in airtight containers and eliminating potential feeding sources like pet food dishes that are left out can prevent pests from finding them. Regularly cleaning crumbs and spills and disposing of garbage promptly can also deter pests.

While a full pest exclusion isn’t possible, sealing entry points can greatly reduce the need for ongoing chemical treatments. This can save homeowners money, time, and stress. Pest infestations are expensive and can cause significant damage to your property. Moreover, they can lower your property value and make it difficult to sell your home.

It is important to understand why sealing entry points matters, where to look for entry points, and what steps can be taken to prevent pests from entering your home. Following these tips can help you keep your home free of pests, protect the health and safety of your family and pets, and maintain a high property value. Lastly, always consult with a licensed pest control expert before attempting DIY pest treatments. Incorrect application of chemicals can result in dangerous exposure and even more serious problems.

Store Food Properly

Food is a primary attractant for pests, and proper storage can help prevent unwanted infestations. Leftover crumbs on counters, pet food in open containers, and rotting fruits and vegetables are enticing for cockroaches, ants, and mice. Food that isn’t properly stored can also attract pests like moths and weevils, so it’s important to store foods in airtight plastic or glass containers, and regularly inspect your pantry and refrigerator for signs of these pests (like tiny holes or flies). If you have pet birds, bird seed should be kept in an airtight container.

In addition to storing food in sealed containers, it’s essential to store other materials properly as well. This includes storing trash in cans with tight-fitting lids, and removing garbage on a regular basis to prevent moisture accumulation and odor. It’s also important to regularly clean underneath and behind appliances, as pests like cockroaches, ants, mice, and spiders can hide in these spaces. Keeping outdoor trash and compost receptacles away from your home, and keeping them closed and secure, will also reduce the risk of pests invading.

For businesses, it’s important to regularly check for signs of a pest infestation. In addition to droppings, chewing marks on wires and food packaging, and strange smells, pests can leave a variety of other telltale clues including shed wings, shed exoskeletons, dark spots on bedding, and greasy trails. Frequent inspections of the facility and its surroundings can help identify potential entry points like cracks in walls, gaps around windows, loose door seals, missing roof tiles, and more.

In addition to reducing food and water sources, it’s important for businesses to eliminate potential habitats for pests. For instance, puddles of standing water can draw mosquitoes and other pests to the facility, while overgrown vegetation can provide hiding places for rodents and birds looking for shelter or roosting sites. Eliminating these factors can significantly lower the risk of a pest infestation.

Posted in Pest Control | Tagged , , , , | Comments Off on Top Pest Prevention Tips For Homes

How to Properly Perform Roof Installation

Many homeowners are capable of handling minor home renovations, but roof installation is an involved process that requires specialized knowledge and equipment. Before starting the process, prepare the work area by clearing away vehicles and outdoor furniture to allow for easy access.

Roof Installation

Look for leaking areas and patched spots that may indicate past repairs or storm damage. Also note any dormers or other features that add to the roof’s complexity and number of facets.

A roof restoration project is a significant investment, and ensuring it’s done correctly ensures your home stays safe and dry for years to come. While many DIY homeowners attempt to tackle roofing projects, the process is complex and requires professional expertise to guarantee quality results. The roof preparation process involves ensuring safety measures, obtaining necessary permits, and choosing a roofing material. Asphalt shingles are cost-effective, while slate offers unmatched durability.

To begin the process, roofers thoroughly inspect your existing roofing. They look for aging shingles and flashing, as well as any other signs of damage that might require repair. They also check for adequate ventilation, which reduces cooling demands and prevents debris buildup.

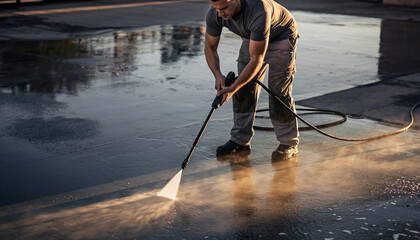
Next, the roofing contractor prepares the surface of your roof for coating application. The roofing surface must be free of dirt, grease, contaminants, tools, and moisture to ensure coating adhesion. Roofing contractors use various cleaning methods to achieve this, including power washing and air blowing.

Homeowners can help expedite the roof installation process by preparing their property in advance. This includes moving vehicles and removing outdoor furniture to give the crew easy access to the roof. They should also cover plants and other outdoor structures with tarps to protect them from falling debris during the construction. Inside the home, wall-hung pictures and other delicate items should be removed or covered. Additionally, pets should be kept in a separate room during the construction, as loud noises and vibrations can stress them.

Underlayment

Underlayment is a crucial component of any roofing project, providing moisture protection and preparing the roof deck for your chosen roofing material. Proper underlayment installation ensures a long-lasting, durable new roof.

The underlayment process begins with a thorough inspection of the existing subfloor and any repairs needed to ensure it is ready for the new flooring or roofing materials. Then the underlayment is applied in accordance with manufacturer instructions. This process ensures that your new flooring or roof will not be affected by moisture in the future and protects against damage to the subfloor.

Depending on the type of flooring you have selected, there are several different types of underlayment that can be used. Typically, a 15-pound asphalt-saturated paper (sometimes called tar paper or roofing felt) is used for solid hardwood and engineered floors over plywood. It is also acceptable for nail-down laminate over plywood or OSB subfloors. However, if you plan on installing a floating floor over the subfloor, a different underlayment should be used that is specifically designed for this application and has an acoustical pad for sound reduction.

Foam underlayment is lightweight, easy to install and offers basic moisture protection. Cork underlayment is mold and mildew resistant, as well as durable and offers good sound reduction. Rubber underlayment is the most expensive and can have a strong odor when first installed. It is a great choice for situations that require the greatest amount of sound reduction.

Flashing

Flashing is a crucial component that prevents leaks and protects roofing materials from structural damage, mold, and other water-related issues. It creates a waterproof barrier that directs water away from critical areas like the crease between the roof and wall or chimney, skylights, and vent pipes. Flashing is made from durable, corrosion-resistant materials like galvanized steel or aluminum and installed around structures that penetrate the roof like chimneys, skylights, and vents.

When a flashing piece is damaged or improperly installed, it can lead to severe water infiltration and costly repairs. However, with proper care and regular inspections, these issues can be prevented.

Typically made from metal, flashing pieces come in a variety of shapes and sizes for specific purposes. Common flashing types include kickout flashing, which sits at the base of a wall to channel water into gutters; valley flashing, which is designed to prevent water infiltration where two sloping planes meet on a roof; and drip edge flashing, which is installed along rafter edges.

When installing flashing, it is important to ensure that there is enough overlap between each piece to create a watertight seal. Also, when a sealant is applied to the flashing, it should be smoothed out for a seamless finish. Regular inspections, especially after storms, are vital to check for cracks or gaps in flashing that could compromise the effectiveness of the waterproof seal and lead to water infiltration.
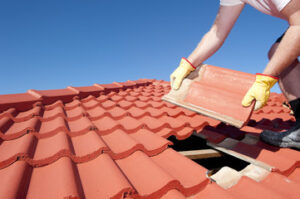
Shingles

Shingles provide a protective layer that protects the roof sheathing from moisture. They come in a variety of colors, shapes, and styles. Some are energy-efficient and help reduce heating and cooling costs. Others feature self-healing technology that protects against impacts and minor damage. Other types include ridge vents to ensure proper airflow and prevent moisture buildup. Manufacturers are also experimenting with fortified asphalt shingles that are more flexible and can handle stronger winds.

Begin the shingle process by marking the center of your roof with a vertical chalk line. Some manufacturers recommend starting the shingle application at this point, but other contractors may start at another location. Follow the manufacturer’s guidelines on laying shingles and how many nails to use per shingle. You’ll need a good number of helpers for this project, as the roofing materials are heavy and will create a lot of debris that needs to be disposed of appropriately.

The first shingle row is placed and secured on the sheathing, making sure the edges overlap the previous layer. A second shingle is then laid on top of the first and secured with nails. Repeat this process for all the rows of shingles until your roof is complete.

Install a drip edge along the roof’s perimeter to prevent water from collecting under the fascia and damaging it or entering the structure. If the eaves are in a cold climate, it’s a good idea to install an ice and water barrier.

Ridge vents

Ridge vents are installed along the peak of sloped roofs to allow air to flow in and out. They are covered with a ridge cap, which can be metal or made of shingles to match the color and design of your roof. Ridge vents are an efficient and cost-effective way to improve attic ventilation, reducing the risk of mold and moisture in your home while extending the lifespan of your roofing materials.

When used in combination with proper attic insulation, ridge vents maintain balanced airflow and reduce indoor temperatures by regulating heat transfer. This ventilation process prevents excessive heat and moisture buildup in the attic and roof area, preventing shingle damage and prolonging the life of your roofing materials.

Static ridge vents rely on natural convection to draw hot air out of the attic and cool air in through soffit vents. They are simple and inexpensive, requiring no power, and provide even ventilation across the entire attic space.

Roof ridge vents can also be used in combination with other ventilation systems, such as roof fans, to increase airflow. However, mixing ventilation systems can lead to a lack of balance and airflow throughout the attic and roof space, which can result in moisture or heat buildup, as well as leaks and mold growth. Therefore, it’s important to have your roof properly inspected and maintained by experienced roofing professionals to avoid these problems.

Gutters

Gutters are a home’s unsung heroes. They skillfully channel rainwater away from the foundation, siding, and landscaping, preventing soil erosion, basement flooding, and structural damage. Unfortunately, gutters can get clogged and leak, causing water to stagnate around the house. And without proper maintenance, they can rust or rot.

Ideally, gutters are installed right along with the roof. The area and slope of the roof determines the layout and placement of the gutters. Aesthetic preferences also influence the selection of a gutter system. Options range from premium materials like copper to more cost-effective alternatives.

A quality gutter system is a critical component of the roof installation process. Make sure the gutters are large enough to handle the amount of water flowing off the roof. If they aren’t, the water will overflow and flood areas around the house. Additionally, be sure to insist that the gutter installer uses wide downspout connectors. Tiny ones will impact the gutter’s ability to drain quickly.

A thorough, conscientious approach to the gutters process sets the stage for a high-performing roofing system that will protect your home for years to come. It’s the best way to avoid costly roof repair and replacement down the road. Contact a professional roofing and gutter expert today to learn more about the installation process. They can provide you with an estimate and discuss options for a new roof and gutters that will keep your home safe and beautiful for decades to come.

Visit our Professional Services Blogs

Smart Choice Plumbing And Air, Sanitize My Airducts, Bethesda Locksmith, Golden Coast Cleaners, Advanced Concrete Staining, Home Pool Cleaners, Brayhines Septic, Shaka Pool And Spa Cleaning,Mr Clean And Shine, Best Appliance Repair Long Beach, Gulf to Bay Water Remediation, Garage Door San Francisco, Richmond Flooring, Fence Builders Woodlands, Colorado Springs Auto, Fuel Frontlines, Expert 24 Option, Sacramento Roseville Real Estate, SLO Homes, Philadelphia Towing, State Powerwashing, Truck Tires Worldwide, Website Translation, Construction Company Farmington NM, Green Home Los Angeles, Trinity SEO Marketing, Electric Fireplaces, Argos Bookkeeping, Christopherson Drywall,Garage Door Installation, Missouri Personal Injury Lawyer Blog, Alvins Auto Body, Carpet Care Pros, Las Vegas Concrete, Clark Concrete Company, Deck Builders Missour City, Lechleitner Builders, Medical Health Insurance Policy, Royal Siding Windows, Carpet Steam Cleaners Review, Go Greeen Lawn Painting, Oakwood Skate Deck, Texas Home Remodeling And Painting, USA Home Repair Remodeling, Dream Home Remodeling Services, Brent Lawn Homes, Great Ernm Homes, Accelerated Orthodontic, Arctic Cooling And Heating, Baltimore Heating And Airconditioning

Posted in Roofing | Tagged , , , , , , , , , | Comments Off on How to Properly Perform Roof Installation

The Journey to a Career in Colorectal Surgery

A colorectal surgeon treats problems with your colon, rectum, anus and pelvic floor. They may be able to improve your quality of life by treating symptoms such as hemorrhoids and inflammatory bowel disease.

Surgeon

While many medical professionals treat conditions that affect the lower digestive tract, a colorectal surgeon has additional training in these procedures. They also have expertise in the latest minimally invasive surgical techniques. Visit https://www.drwesleyhigh.com/ to learn more.

If your primary care physician detects a possible problem with your lower digestive tract, they may refer you to a colorectal surgeon for an official diagnosis. A colorectal surgeon has completed specialized training in the surgical care of conditions affecting your colon, rectum and anus.

Your health care team may start with a physical exam and your family and personal medical history. They will also order a number of tests. These can include a fecal occult blood test, which checks your stool for blood that cannot be seen with the naked eye. A sigmoidoscopy and/or colonoscopy will allow your doctor to examine the inside of your colon and rectum, removing any polyps or other suspicious growths that they find.

Other tests can help your doctor determine if the tumor is malignant, or if it has spread. They can include CT or MRI scans of your abdomen, pelvic area and chest. A PET scan may also be used, which can measure the activity of your cancer cells. Your doctor will also check for tumor markers, such as carcinoembryonic antigen (CEA), which can be elevated in patients with colon cancer.

A colonoscopy is a surgery that involves inserting a long, flexible tube with a camera on one end into your rectum and colon to examine the interior. Your surgeon can perform this procedure laparoscopically or robotically, which has less pain and faster healing, compared with traditional open surgery.

Another condition that can be diagnosed with a colonoscopy is diverticulitis, a condition in which small bulging pouches develop in your digestive tract. This condition can be painful and may cause infection and complications such as a colostomy. Your doctor will likely recommend surgery to remove the diseased segment of your bowel and then reconnect the healthy segments.

Your doctor will recommend a clear liquid diet for several days before your procedure and cleanse your colon with strong laxatives in a process called bowel prep. During this time, you will need to empty your bladder often and record the results in a journal. The length of your hospital stay varies depending on the type of surgery you undergo.

Treatment

A colorectal surgeon, also known as a proctologist, is a general surgeon who has completed additional training in the diagnosis and surgical care of diseases that affect the colon, rectum and anus. This includes benign and malignant conditions that can affect your ability to digest food and produce bowel movements.

Your primary care physician may refer you to a colorectal surgeon when your symptoms indicate that there might be an issue with your lower digestive tract. This is because a colorectal surgeon has extensive training in the area and can quickly assess your condition to determine what course of treatment is best for you.

In some cases, a colorectal surgeon will recommend that you begin treatment with dietary changes and physical therapy. But if these aren’t effective or your symptoms become more severe, surgery might be necessary. An experienced colorectal surgeon will use minimally invasive procedures when possible to reduce pain, risk and recovery time for their patients.

Some of the most common colorectal surgeries include:

Polypectomy — removal of small growths in your colon that might be cancerous. Strictureplasty — relieves narrowing in your colon caused by inflammation from Crohn’s disease. Colon cancer — removal of a tumor or part of your colon when it’s found early. Abdominoperineal resection — removing your colon from the boney portion of the pelvis, which is sometimes needed when a tumor has grown into the rectum sphincter.

During surgery, your colon or rectum might need to be attached to an opening in the abdomen called a stoma. This might be done if your colon has been removed due to cancer or if you’ve had a colon resection due to an accident or illness. Once you’ve recovered, a doctor can reverse your colostomy or ileostomy so that you can eat and drink normally again.

While recovery from surgery can take a while, it’s important to have a team of health care professionals by your side who can help manage your pain and provide support. In most cases, your health care team will prescribe you medication to control any discomfort following surgery. It’s also important to eat a well-balanced diet while you’re recovering from colorectal surgery so that your body can get the nutrition it needs to heal properly.

Preparation

You may be referred to a colorectal surgeon by your primary care physician or gastroenterologist (a specialist in gastrointestinal conditions). You will need to follow bowel prep instructions before surgery. These are designed to cleanse your lower digestive tract of food and feces, and they help your doctor achieve a clean surgical site that can minimize postoperative infections.

During a bowel prep, you will drink clear liquids and a laxative solution, either at home or in the hospital. These liquids will help you empty your colon before your surgery, which can take several hours to complete. The bowel preparation process is important because your colon contains many bacteria, and a clean surgical field helps reduce the risk of infection after surgery.

Your doctor may also prescribe a stool softener and an anti-inflammatory medication. It’s best to stop taking any medications that contain aspirin or ibuprofen, which can decrease blood clotting during surgery and increase bleeding risks. You should also purchase 2 saline enemas at the pharmacy before your procedure to use at home. These can be purchased without a prescription at your local drugstore, but be sure to talk with your surgeon about preparing for surgery and the supplies you’ll need for recovery.

If your doctor can’t internally reconnect the rectum or anus, he or she will create a hole in the abdomen and attach the intestine to the skin with a plastic tube called a stoma. The stoma is then connected to a bag that collects waste. This is a surgical procedure known as a colostomy, and it can treat severe complications such as intestinal blockages, fistulas and cancer.

During your operation, you will have intravenous catheters placed so the nurse can administer medications during surgery, and you will be attached to a urinary catheter to drain urine from your bladder. The surgery itself can be done with open or minimally invasive techniques. If you have an open procedure, you will need to stay in the hospital for several days. Minimally invasive surgery requires a shorter hospital stay. After you return home, you will need to follow dietary restrictions and other preoperative instructions for recovery.

Recovery

The recovery process after colorectal surgery will vary depending on the surgical procedure performed. Patients undergoing colon resection may be hospitalized for several days to a week, during which time they are not given solid foods and only receive nutrients through intravenous tubes. Clear liquids are slowly introduced after this and the patient is instructed when he or she can start eating solid foods again. Patients can expect to be sore around the incisions and feel weak for a while after surgery.

Your doctor will discuss your recovery options with you before the surgery and answer any questions you might have. He or she will also tell you what to expect from the procedure and how long it will take to recover fully.

Some common conditions that colorectal surgeons treat include colon polyps, rectal cancer, diverticulitis, and inflammatory bowel disease. Other conditions treated by colorectal surgeons include anal rectal surgery and rectum prolapse (a condition that causes the lower abdominal muscles to weaken, which can cause fecal incontinence).

Before you have colorectal surgery, your doctor will ask for medical history, perform a physical exam, order laboratory tests, and get an electrocardiogram. You may need a computed tomography (CT) scan of your abdomen before the operation as well.

During your recovery, it is important to stay hydrated and to exercise as often as possible. This helps to prevent blood clots and promotes healing. Your doctor will recommend certain activities and exercises for you to avoid and others that are safe to do.

You should also make sure to take any pain medications as directed by your doctor. Be aware that pain medication can lead to constipation, so it’s important to use stool softeners if necessary. You should also make sure to talk to your doctor about other ways to manage your pain if you’re not having success with the prescribed drugs.

Once your recovery is over, your doctor will advise you on how to care for yourself at home and when it’s okay to resume your normal routine. He or she will give you specific instructions about what to do if you have an ileostomy or colostomy, including how to clean and change your colostomy bag as needed.

Visit our Professional Services Blogs

Chris Atkins Lawncare, Atticus Landscaping, Treasure Coast Pressure Wash, Gulf Beach Plumbing, Marlborough Plumbing, Guns And Hoses Pressure Washing, Ambrose Construction, Coral Gables Pressure Washing, Willco Photography, Roofing Akron, Danalogsdon Roofing El Cajon, EC Siding Roofing Windows, Aurora Gutter, American Insurance Source, ECO, etdn, Denison Service League,  Roofing Blog, Atlantic Vinyl Windows, Brookshires Fireplaces, JD Advanced Remodeling, Product Judgment, Master Dry Foundation Repair, Moe’s Hip, Elta Patio Paramount, Rock Around The Clock Festival, Learn, Play, Beyond, MoralesT Gardening, Car Window Tinting Perth, Duncan Carpentry, Gatestone Lighting, Mid Missouri Mold Inspections, Stucco Repair Albuquerque, Wausau Siding Hire, Munster Tree Care, Blue Granite Homes, Custom House, CENTRAL OS, Atlanta Pavers, Phillips Law Firm, Brent Ryder MasonryWalker Construction Drywall Division, RJ Law, Caledon Plumbing, DDS Tech USA, Maine Mortgage Services, Inckpen, Seasons at Rose Creek, Cottonwood Place Dental, Cosmetic Laser 2000 

Posted in Surgeon | Tagged , , , , | Comments Off on The Journey to a Career in Colorectal Surgery

A Nursing Home Abuse Attorney Can Help

Abuse in a nursing home can be emotional and devastating for victims. A lawyer can help them recover damages for their losses and put an end to the negligence.

Home Abuse Attorney

Experienced attorneys know how to thoroughly investigate a case and build a strong argument for compensation. They will identify warning signs, such as unexplained physical injury or financial irregularities. Contact Chicago Nursing Home Abuse Attorney for professional help.

If a loved one is a resident of a nursing home, it’s important for family members to pay close attention to their wellbeing and be mindful of any unexplained changes in behavior. This can include sudden outbursts of anger, depression, or withdrawnness that could be signs of emotional abuse. It’s also crucial to be alert for signs of financial exploitation, such as suspicious thefts, forging signatures on legal documents, and manipulation of retirement accounts.

Abuse in nursing homes can take on many forms, from physical to psychological to financial. Physical abuse can involve hitting or pushing elderly patients, which can result in fractured bones, disfigurement, and serious injuries. Psychological abuse can include belittling or insulting a resident, which can lead to anxiety, depression, and post-traumatic stress disorder (PTSD). Physical and emotional abuse can be difficult to detect, especially when the victims don’t speak up out of fear or because they lack the capacity to communicate their experiences.

Neglect is another form of nursing home abuse, which involves failing to meet a person’s basic needs. This can be a serious problem because it means that the residents aren’t getting adequate food, water, shelter, medical care, and hygiene.

When an elderly resident isn’t being provided with these essentials, it can cause severe health problems and even lead to death. It’s important to recognize this type of neglect and take action.

The good news is that nursing homes are held to high standards, and a skilled Nursing Home Abuse Attorney can help you pursue justice on behalf of your loved one. A lawyer can guide your case through the complexities of the legal system and help you build a strong claim against negligent or abusive caregivers.

It’s essential to contact a qualified attorney as soon as possible. There’s a strict statute of limitations in place, and waiting to file a lawsuit can prevent you from seeking justice or recovering compensation on your loved one’s behalf. When you reach out to an experienced attorney, he or she can review your case and assess whether there is sufficient evidence to pursue a lawsuit.

Gathering Evidence

When a loved one in your care suffers harm, it is important to act quickly to protect them and seek justice. A skilled nursing home abuse attorney can help you gather the necessary evidence to support your claim. They can also manage the legal complexities of your case to secure compensation for the emotional and monetary damages you and your loved ones have suffered.

Nursing home abuse can take many forms, from physical abuse to financial exploitation. The first step is to document any suspected abuse through photographs or video footage. A detailed written journal of observations and conversations can also be useful. These can help you track changes in condition or behavior that may indicate abuse, such as unexplained bruises, weight loss, or a decline in personal hygiene. You should also monitor any money matters, such as unexplained transactions on bank accounts or unexplained fees on credit cards.

Abuse in nursing homes often goes unreported, as victims might not be able to communicate their experiences due to medical conditions or fear of retaliation from caregivers. They might also be too ashamed to admit they were abused. Observe your loved one regularly, and trust your instincts.

Medical records can provide valuable evidence in a nursing home abuse case. For example, a physician’s note indicating that a patient was restrained with physical or chemical means can reveal the facility ignored the individual’s rights. Other documents to save include staffing and employment records, as these might point to chronic understaffing or a lack of training that led to neglect or abuse. Facility inspection reports are another useful piece of evidence, as they may highlight safety concerns that have been neglected.

Finally, it is important to gather witness testimony. Other residents, visitors, and even staff members might have witnessed or heard about abuse or unsafe conditions. A skilled Staten Island nursing home abuse lawyer can help you obtain reliable and convincing statements that can support a claim for compensation. Your family might be eligible for compensatory damages such as medical expenses, lost wages, and pain and suffering. You might also be able to collect punitive damages, which are designed to send a message that such abusive conduct will not be tolerated.

Investigating the Case

The law firm may then conduct a more thorough investigation, gathering additional evidence like medical records and photos, interviewing witnesses, or even hiring experts to assess the nursing home facility’s quality of care. In cases of neglect, for instance, the law firm might request that your loved one’s doctor note any bedsores or lacerations they may have. This can help provide a clear picture of the type of injuries your loved one has endured and the extent of their harm.

When investigating nursing home abuse, the firm also asks residents and their family members for any firsthand accounts of what they have witnessed. This can be a difficult time for families, but it is important that they be open and honest, as the law firm needs to have all the facts in order to properly pursue justice on behalf of their loved ones.

Nursing homes have a duty to protect their residents’ health and human dignity. If they fail to fulfill this duty, they can be held liable for any injuries or deaths that result. A successful claim against a nursing home’s liability insurance or a lawsuit can provide injury victims and their family members with financial compensation that helps them heal and recover.

Sometimes, law firms try to work out settlements with the nursing home owner or their insurance in order to avoid the need for a lengthy legal battle. These settlements can cover things like hospital bills for a victim’s treatment that were incurred as a result of the abuse.

While physical mistreatment is more obvious, there are many other forms of nursing home abuse that can go unnoticed. This includes emotional, verbal, or psychological abuse. It can also include financial exploitation, which could be the result of nursing home employees or even family members taking advantage of elders who are vulnerable or cognitively impaired by stealing their property or using their money.

Signs of nursing home abuse can be difficult to notice, but regular communication and attention to your loved one’s well-being can help. Be alert to unexplained bruises, a lack of personal hygiene, withdrawal or agitation, and sudden changes in behavior, and keep an eye out for changes in your loved one’s finances.

Taking Legal Action

When people think of nursing home abuse, they often picture physical mistreatment such as hitting, kicking, or punching. However, many forms of abuse are not as obvious. Neglect, emotional, or financial abuse can occur at nursing homes and can lead to serious harm for the elderly victim.

If you suspect your loved one is a victim of any type of nursing home abuse or neglect, it’s important to take action immediately. A Pennsylvania nursing home abuse attorney can help you determine what type of legal action is appropriate in your case. The attorney will also review the extent of your loved one’s harm to understand how much compensation should be awarded.

There are several parties who could be held liable for your loved one’s injuries, including the nursing home staff members directly involved in their mistreatment, the facility administration and management, and even the company that owns the home. An investigation will help determine the liable parties and their roles in your loved one’s abuse or neglect.

Some signs of nursing home neglect or abuse are visible, such as unexplained bruises or a decline in personal hygiene. Other signs of neglect, like bedsores, infections, or poor nutrition, are not so apparent and can be a result of neglect or even medical negligence.

In some cases, your loved one may suffer from psychological or sexual abuse at a nursing home. This is a very difficult form of abuse to detect and can go unreported, especially if your loved one is unable to communicate or fears retaliation from caregivers.

The attorneys can help you identify and report any suspected forms of nursing home abuse or neglect to the authorities and to the facility. The team can then take proactive measures to secure compensation for your loved one’s harm while seeking justice and prevention of future abuse or neglect. Contact our firm today to learn more about the legal options available for your family. We are committed to securing maximum compensation for the suffering your loved one endured. Our initial consultation is free and confidential.

Posted in Lawyer | Tagged , , , , , , | Comments Off on A Nursing Home Abuse Attorney Can Help

Types of Cabling Used in Commercial Electrical Services

Electrical wiring plays a crucial role in commercial properties. It enables functional systems and ensures the safety of the property’s occupants. However, it requires regular maintenance to prevent unforeseen issues.

electrician

Flickering lights, burning smells and discolored outlets are signs of underlying electrical problems that need to be addressed. Professionals can inspect the entire system to detect and repair any electrical faults. Keep reading the article below to learn more about Commercial Electrical Service.

MC wiring is an essential component of commercial electrical services, providing a unique blend of strength, security, and adaptability. However, it’s important to note that different regions have their own building codes and fire safety regulations that must be adhered to when using Type MC cables. This is why it’s critical to consult with a professional and reputable cable supplier that understands local requirements. Having an expert on your team will make navigating complex rules and regulations much easier, while also ensuring that you choose the right cabling for your specific project.

When choosing a supplier for your commercial electrical services, look for one that offers a wide range of sizes and AWG counts to suit the needs of your specific installation. In addition, ensure that they stock a variety of tools for cutting the metallic sheath, including heavy-duty cable cutters and hacksaws. Using the proper tools will help to prevent damage to internal conductors, while also promoting accuracy and a clean, straight cut.

Another consideration when selecting a MC wire supplier is the ability to provide you with a full line of fire-rated cables. These cables are designed to maintain circuit functionality for two hours under fire conditions, helping to keep emergency lighting and fire alarms operational in the event of an accident or disaster. They’re perfect for large-scale projects like high-rise buildings, tunnels, and hospitals where life safety is critical.

Type MC cables are made from THHN/THWN-2 insulated conductors and feature a durable interlocked aluminum armor. They’re ideal for dry location exposed or concealed work and installations in cable trays or approved raceways. Each cable also includes a dedicated green insulated ground wire that provides a reliable equipment grounding path. This helps ensure compliance with NEC article 330 and facilitates easy inspections for your commercial electrical service.

Compared to conduit systems, MC cables are a safer and simpler option. They don’t require the use of conduit fittings, which can lead to water leakage, and they don’t require the labor-intensive process of threading and lubricating wire. They’re also less expensive than cables that need to be pushed through winding conduit pathways.

Type EMT Wiring

Electrical metallic tubing, or EMT, is a thinner-walled conduit option that can be used in commercial and industrial wiring. It is usually made of coated steel and is used in applications that require less durable and rugged materials than rigid metal options. This type of conduit is often chosen due to its balance of strength, affordability and ease of installation. It is not as durable as Rigid Metal Conduit (Type RMC), but it still offers sufficient protection in most installations. It is often used with a variety of connectors, couplings and straps.

It is primarily used indoors, but it can be installed outdoors in exposed or concealed locations with the proper watertight fittings. In wet environments, it is typically paired with corrosion-resistant accessories such as compression couplings or zinc-coated ones.

The thin wall design of EMT makes it lighter than rigid metal conduits, which makes it easier to handle and install. This flexibility also enables it to be routed around obstacles and structures without the need for additional fittings. It can also be bent on-site with manual or powered conduit benders, allowing it to fit into tight spaces and follow the shape of the building structure. This allows it to be used for more complex runs than other types of conduit and can even accommodate 90-degree sweeps and double-box offsets.

When working with EMT, it’s important to have the right tools and know-how to handle it properly. A good quality conduit bender is essential for bending the tubing correctly to ensure it doesn’t damage the wires inside. It is also important to properly scout the battlefield before beginning an installation, as this helps in determining the best routing and ensuring that all necessary materials and accessories are on hand before diving into the project.

Once the routing is complete, it’s important to make sure that the proper fittings and mounting accessories are used to secure the conduit in place. Connectors and couplings provide a safe connection between lengths of conduit, and they come in a number of different styles to suit specific requirements. Straps and hangers are used to fasten the conduit to walls, ceilings and frames, and they offer a sturdy support for long runs.

Type MI Wiring

In a commercial electrical service context, MI cable is generally used for safety-critical signal and power circuits. Unlike plastic-insulated cables, MI cable uses a metal sheath with organic insulation that is very resistant to fires and provides excellent mechanical strength. This is particularly important in high-temperature environments and for use in power systems where a small fire could damage control or power cables. MI cable is also highly resistant to ionizing radiation and finds use in nuclear reactors and nuclear physics apparatus.

MI cables may be covered with a plastic sheath, which can be coloured for identification purposes and provides additional corrosion protection for the copper sheath. They are also available with an outer sheath of abrasion-resistant polyurethane, which is very useful for installations in abrasive environments such as mining operations.

Depending on their application, MI cables are either embedded in concrete or run through cable tray. When they are embedded in concrete, they should be protected from damage by a protective covering or shield. Otherwise, they are susceptible to pinholes that can allow moisture into the insulation. This can lead to premature failure of the circuit. When running MI cables through a cable tray, they must be properly supported to prevent damage to the cores or conductors.

In addition to their resistance to corrosion and ionizing radiation, MI cables offer excellent thermal and mechanical properties. They can be installed in various temperatures, and they are resistant to vibration and abrasion. This makes them ideal for applications in harsh environments, such as underground mining. They can also be installed in hot environments such as industrial heating.

Another great advantage of MI cables is their ability to withstand high levels of electromagnetic interference (EMI). The metallic sheaths help protect the conductors from EMI generated by machines and devices that emit electromagnetic fields. This makes them perfect for a variety of electronic and electrical applications, such as power distribution, data transmission, and process instrumentation. They can even be used to protect sensor wires, such as thermocouples and RTDs. These extensions allow the sensors to communicate with their meter, controller, or DAQ system without losing their readings.

Type THWN Wiring

When it comes to electrical wire, there are a lot of different options. You need to choose the right one for your needs and install it according to local building codes. THHN and THWN are two common choices for building wiring applications, but each has its own advantages and limitations. Let’s look at these types of building wire in more detail to find out which one is better suited for your needs.

THHN is the most commonly used type of building wire in the United States. It’s a thermoplastic heat and water-resistant nylon-coated wire that can withstand high temperatures. It also has good resistance to oil, grease, and other chemicals. This makes it a great choice for a wide variety of commercial and industrial applications.

This type of building wire can be found in many different configurations, including single- and multi-conductor varieties. It can be solid or stranded, with PVC insulation and a nylon jacket. Electricians usually use this type of wiring for indoor projects. It can safely carry power to appliances like garbage disposals and hot water heaters. It can also be used to run lighting, switches, and outlets in buildings.

Another use of THHN is to supply electricity to outdoor equipment and lighting. It can be installed in conduit or cable trays, and it’s rated to 90 degrees Celsius. It can also be used in wet environments if it’s properly protected.

In some cases, electrical contractors use THWN wire for grounding purposes. It can provide a safe path for electrical currents to return to the ground in the event of an overload or fault. It also protects against moisture and contaminants and is easy to solder.

When choosing a type of wire for your next project, it’s important to consider the environmental conditions where it will be installed. THHN is the best option for dry locations, while XHHW-2 is a better choice for wet or damp environments. This way, you can ensure that your wiring is safe and reliable for years to come. In addition to being able to handle high temperatures, THHN is also resistant to chemicals and oil.

Posted in Electrician | Tagged , , , , | Comments Off on Types of Cabling Used in Commercial Electrical Services

Landscape Designers Create Beautiful Outdoor Spaces

Landscape Designers Honolulu HI create beautiful, functional outdoor spaces. They spend much of their time at client sites, analyzing land, and designing.

Landscaping

They also liaise with contractors, write proposals, and perform office tasks. They often use CAD software to prepare rough and more detailed plans.

They must be knowledgeable of landscaping and horticulture, and understand local zoning regulations.

There are no state-mandated educational requirements to hang out a shingle as a landscape designer. However, many choose to complete a bachelor’s degree in horticulture or garden design and gain practical experience through internships or work placements. An accredited program offers a solid foundation that can lead to career success, as well as provide the necessary credentials to pursue professional certification.

Knowledge of plant species and their growth habits is essential for creating sustainable outdoor spaces. It also allows landscape designers to select plants that can thrive in a given climate, ensuring their designs remain healthy and aesthetically appealing over time.

Proficiency with design software programs is also important. These tools enable landscape designers to create detailed plans and simulations that can be used to present their ideas to clients. Moreover, these programs help in identifying potential problems and making adjustments accordingly.

Often, landscape designers are called to work near sensitive areas like wetlands or steep hillsides. This is why they must be familiar with local environmental regulations. A good understanding of these regulations ensures that the landscape projects are completed safely and without running afoul of any environmental laws.

Keeping up with industry trends is important for landscape designers. This is particularly true for professionals specializing in sustainability and eco-friendly practices. Additionally, it is helpful to understand how new technologies like smart landscapes and green infrastructure can be integrated into your landscape design.

Education and Training

Landscape designers use their creativity and technical skills to bring outdoor spaces to life. They need to balance site visits, client meetings, presentations and office work in order to take projects from concept to completion. A good education and training in design principles, horticulture, the uses of water and plant materials are all necessary for this role.

A bachelor’s degree in landscape architecture takes four years to complete and typically involves a combination of lecture courses and studio design projects. Coursework covers the foundations of design, drafting and computer-aided drafting (CADD), as well as a deeper dive into subjects like site analysis and ecological principles. Some degree programs also offer internship opportunities where students can gain practical experience in the field.

An associate degree in landscape design takes two years and can be a great entry point into the industry. These programs focus on the fundamentals of landscaping and horticulture, as well as landscape design and drafting. They also provide hands-on training in the use of design software.

As the world becomes increasingly concerned with environmental sustainability, knowledge of eco-friendly design practices is becoming a vital component in the landscape design process. Some online certificate programs in landscape design incorporate modules on this subject, giving graduates a competitive edge in the job market. This includes courses on plant identification and selection, site assessment and soil remediation. A strong understanding of these topics can help landscape designers to create sustainable gardens that are both beautiful and long-lasting.

Site Analysis

Site analysis is a key step in the design process, allowing landscape architects to fully understand a project’s context, environmental factors and user requirements. This allows designers to craft designs that integrate with the natural environment, promote environmental sustainability and ensure that outdoor spaces are accessible and functional.

During this phase, the designer conducts a thorough inspection of the site, paying special attention to existing hardscape, vegetation and drainage features. Using a checklist of site-specific factors, including climate conditions, sun and wind patterns, soil type, access points, cultural considerations and zoning regulations, the designer creates a thorough site report.

The information gathered during the site analysis is critical to establishing the overall scope and budget of a project. This helps keep projects on target to meet or exceed their desired completion dates and prevents costly rework during the design phase.

In addition to identifying existing elements, the site analysis report details the topography of a property including its slope, drainage and elevation. This information influences building orientation, grading and hardscape construction. It also determines the availability of utilities such as gas, electricity and water. The analysis includes a detailed description of the site, its history and current conditions as well as a list of any potential concerns or challenges. The data gathered during this phase of the design process also supports sustainable design practices by assessing a site’s solar orientation, temperature extremes and prevailing wind patterns to guide energy and passive design strategies.

Conceptual Design

During the conceptual design process, a landscape designer develops a layout for your outdoor space. They will also include specific landscaping features like pathways, retaining walls, water features and more. It’s important that the designer understand your aesthetic and desired budget before developing concepts. This prevents wasting time on a design that doesn’t align with your expectations or exceeds your investment level.

It’s also helpful for a landscape designer to have a firm grasp of basic design principles. These principles can help create aesthetically pleasing designs that are functional and sustainable. Some of these principles include unity, balance, proportion, repetition and line.

Once you approve the conceptual design, a landscape designer will then move onto the detailed plans and documentation phase. Depending on the complexity of your landscape, this can take weeks or even months to complete. This stage will also include the development of plant lists, irrigation plans and other technical documents required for construction.

Landscape designers use Vectorworks Landmark, a software solution that helps them streamline the design process and improve productivity. It helps them create accurate project quotes and provides better communication with clients through advanced visualisation capabilities. Proficiency in this software will enhance your career opportunities, especially in firms that value integrated design practices. It will also enable you to work on a variety of projects and build a solid portfolio. The right tool can make a significant difference in your ability to produce and deliver results on time and within budget.

Construction Documentation

Once the design development phase is complete, landscape construction can begin. This process involves installing hardscape features such as patios, walkways, and retaining walls as well as softscape elements like plants and trees. During this time, skilled contractors and craftsmen work diligently to bring the vision of the designer to life. To ensure a seamless transition between design and installation, the landscape architect must create detailed construction documents that are used as a guide for contractors and builders.

Construction documents consist of visual drawings and written specifications that describe the work to be completed by a contractor, including all necessary details and dimensions. The production of these documents requires close coordination between architects and engineers. It is also important to communicate with clients and other stakeholders throughout the process in order to identify any potential changes or misunderstandings.

Best practices for creating construction documents include ensuring clarity through use of clear language and notation, establishing consistency and coordination across all documentation, and leveraging technology to enhance project accuracy and efficiency. In addition to standardizing drafting formats and templates, it is critical to share a common database for the storage of all construction documents so that they are easily accessible to all parties. In addition, a comprehensive system for managing change orders is essential to keep projects on schedule and on budget.

Installation

Landscape Design is the art of transforming outdoor spaces for residential and commercial properties. It requires a deep understanding of the environmental, aesthetic and functional considerations of each space. It is a multi-faceted profession that involves horticulture, architecture and engineering, land grading and drainage, soil testing, design and construction. Landscape Designers are unique in that they offer the ability to create aesthetically appealing and functional landscapes while maintaining a balance between design, budget, and maintenance.

Unlike other landscape professionals who work with large-scale projects like parks, golf courses and commercial properties, Landscape Designers focus on smaller projects for homeowners. This allows them to offer a more personal touch, and truly get to know their clients and their unique needs.

One of the most important things homeowners can do is to write a list of their priorities and preferences before meeting with a Landscape Designer. This helps them to narrow down what is realistic based on the amount of space they have and their budget. It also helps the Landscape Designer understand their client’s unique style and tastes better.

During the installation process, the Landscape Designer will experiment with different plant and hard scape options to find the ones that best suit the homeowner’s functional needs, site conditions, and budget. Once the final design has been approved by the homeowner, and permit obtained (if necessary), the landscaping process can begin.

Posted in Landscaping | Tagged , , , , | Comments Off on Landscape Designers Create Beautiful Outdoor Spaces

How to Prep Cabinets for Painting

Cabinet Painting Sacramento

Cabinet Painting Sacramento can completely transform the look of your kitchen. To achieve a smooth finish that will last, proper prep is key.

First, empty your cabinets. Then, use a trisodium phosphate (TSP) cleaner to clean the surfaces. Empty drawers as well. Be sure to label where each door and drawer goes with painters tape before removing them.

Clean the Cabinets

If you are planning to repaint your kitchen cabinets, the first step is to remove all of the hardware (handles and pulls) from the cabinet doors. This will allow you to paint around them easily. Next, take a damp cloth and clean the surfaces of the cabinets. This will remove any dust, dirt or grease that has built up on the surface of the cabinet. If there is a lot of grease or oil, you may need to use a degreaser on the surfaces to cut through it and make them smooth for painting. A good quality degreaser should be able to eliminate the grease and oil within a few minutes. Be sure to test any cleaner on a small area of your cabinets before applying it to the entire surface so that you know whether it will damage your cabinets or cause discoloration.

Once the cabinet surfaces are cleaned, it is time to prime them. A high-quality primer is essential to ensuring that the top coat of paint adheres properly and looks great. Sherwin-Williams recommends their Extreme Bond primer for cabinet refinishing projects because it provides superior adhesion and a strong base coat for the topcoats to adhere to.

It is also important to use a mildew-resistant primer in moisture-prone areas such as kitchens. This will prevent any mildew growth that could potentially affect the longevity of your new paint job. After priming, let the cabinets dry for at least 24 hours before proceeding with the rest of the refinishing process.

A light sanding of the surfaces of the cabinets will help to smooth any imperfections that are present. This is especially important for the cabinet door edges, where scuffing can occur due to daily use. Use a medium-grit sandpaper, such as 100- to 150-grit. If you have a harder time getting rid of any scuff marks, you can always use 220 grit sandpaper to get the job done.

After sanding the cabinet surfaces, wipe them down with a damp cloth to remove any dust and debris. This will prepare the surfaces for the final step of prepping the cabinets for painting, which is to apply a thin layer of spackling paste with a putty knife. This will fill any cracks or holes that are present on the cabinet doors and frames. After the spackling paste has dried, it can be lightly sanded with the sandpaper once again to smooth the surface for painting.

Scuff Sand the Surfaces

When painting cabinets, a high-quality primer is an essential part of the process. It lays the foundation for your paint job, helping the new coats of color adhere to the cabinet surfaces and resist chipping or peeling later on. A good primer also provides a smooth base for the new paint job, making the final result even and attractive.

When choosing a primer for your project, it’s important to consider the conditions that will be most common in your home. If you live in a humid environment, for example, you may need to use a degreaser like Krud Kutter or another oil-based product to get rid of excess grease that can build up on kitchen cabinets and prevent proper adhesion.

For most clean surfaces, however, a good all-purpose primer such as Fresh Start or Extreme Bond Primer is ideal. These acrylic primers offer maximum hide and suppress stains, plus they provide excellent adhesion to wood and other substrates. A quick test application in an inconspicuous area can help you determine if the primer is suitable for your needs.

While you’re at it, it’s a good idea to lightly sand any areas where the cabinet surface is very rough. This can include deep gouges, nicks, scratches, and rough or uneven bare wood. For best results, it’s a good idea to tape off the area around any damaged areas you are working on. This will minimize unintentional sanding beyond the damaged area.

You should also lightly sand any painted areas where the cabinet finish is a darker color, to prepare them for a lighter paint job. It’s also a good idea to sand any areas that will be repainted with a glossier product, such as semi-gloss or satin. A light sand with 220 grit sandpaper can be helpful in getting these areas ready for their new coat of paint.

Finally, don’t forget to clean the hardware before you start painting. It’s a simple step that can significantly affect the final appearance of your cabinet paint job. Be sure to work with a soft, lint-free cloth to avoid damage from the metal’s sharp edges. If you’re looking to make your hardware really pop, try using a spray can of BEHR PREMIUM Metallic spray paint to give it an elegant sheen.

Prime the Cabinets

A light coating of oil-based primer is all you need to prep cabinets for painting. It will improve the adhesion of paint, preventing chipping and peeling later on. I used KILZ 3(r) PREMIUM Primer because it has great adhesion, even on glossy surfaces, and is mildew-resistant which is ideal for moisture-prone areas like a kitchen.

After applying the primer, you’ll need to sand again, this time very lightly. Using a 220 grit sponge, you’ll need to knock down any high points of the surface and wipe it down again with a tack cloth. This will give you a really smooth finish. Be sure to work in good lighting so that you don’t miss any spots.

After sanding, it’s important to clean again with mineral spirits. This product will not swell the wood and it will also help to remove any remaining dust particles. Be sure to do this in a well ventilated area because the fumes can be strong. Once you’re done, use a tack cloth to pick up any lingering bits of dust and dirt. It’s a good idea to number your doors as you take them off so that they go back in the right place once you’re done painting.

Clean the Hardware

When painting kitchen cabinets, it’s not uncommon for the hardware to be painted too. This is especially true for cabinet knobs and pulls, which are frequently subject to the heat of stoves, water and food splatters, or oil from hands. So it is important to clean these items before reinstalling them.

If the hardware is in good condition, it may be able to be sanded and repainted with little trouble. But, in some cases the existing paint may need to be stripped completely before the hardware can be reinstalled. There are chemical stripping products designed specifically for this purpose. Follow the manufacturer’s directions for using these products to remove the old paint from your hardware. Be sure to clean the hardware after stripping it thoroughly to remove any product residue and odors.

Mechanical removal methods, such as sanding and wire brushing, can also be effective for removing stubborn paint from hardware. However, they can be messy and difficult to control, especially when dealing with metal surfaces that are easily damaged. For this reason, it is often preferable to use chemical strippers when working with delicate hardware.

After the hardware is removed, the cabinets should be cleaned thoroughly with a degreasing cleaner such as TSP (trisodium phosphate). This is particularly important for kitchen cabinets, where grease and steam can build up over time. This step is also important for preparing the cabinet surface for primer and paint.

Before priming, the surfaces should be allowed to dry completely. A few hours is usually sufficient. If a second coat of priming is desired, this should be applied after the first one has dried.

The choice of primer is an important decision, especially in a high traffic area like a kitchen. For these cabinets, I chose KILZ 3(r) PREMIUM Primer because it provides excellent adhesion to prevent future paint chipping and peeling, as well as a mildew-resistant coating to keep the paint looking great for years to come.

After the primer is dry, the cabinets can be painted with your chosen color of paint. I used Benjamin Moore Backwoods, which is an alkyd paint that will hold up to the wear and tear of a kitchen. Alkyd paints, such as this and Sherwin Williams WP-500WP Interior Semi Gloss Enamel, are formulated to be durable and stain resistant.

Posted in Cabinet Painting | Tagged , , , , , , , | Comments Off on How to Prep Cabinets for Painting

What You Need For Garage Door Installation

Garage doors can be heavy, involve high-tension components, and have safety features that require precise calibration. This can make them difficult to handle for DIYers.

Before beginning the project, remove furniture and other items from the work area. Also, move vehicles out of the way. Prepare the work area by covering it with a tarp or cardboard.

Cost

Many factors can influence the cost of garage door installation. Some options include the material of the door, its insulating value, and additional features such as openers, keypads, and lights. The size of the door also impacts the cost. Single large doors are cheaper than multi-car configurations, which require more hardware and labor. Other factors that affect the cost are local labor rates, permit requirements, and installation complexity.

The average steel garage door costs around $800, though premium materials and high-end designs add to the price. Wood garage doors are more expensive but offer unmatched beauty and long-term durability. Other popular options include vinyl and fiberglass, both of which are low-maintenance and weatherproof. Insulation add-ons help regulate temperatures and improve energy efficiency, but they also increase the price.

Installation costs include removing and disposing of the old door, securing the new door to the frame, and conducting safety checks. Adding accessories such as lights, keypads, and security sensors increases the overall project cost. If you choose to make your new garage door automatic, it will need electrical wiring, which can be done by an electrician for a fee. Building permits and inspections may also add to the total project cost. It is best to hire a professional for the job, as they are trained to pull permits and ensure that the installation is safe.

Materials

Whether you’re installing an automated garage door or a basic manual one, you will need a few key materials for the job. First, ensure that there’s a functional electrical outlet nearby and make sure that you have the right tools for the job, including a drill, screwdrivers (both flathead and Phillips), pliers, wrenches, and wire strippers. You may also want to have a pair of safety glasses and protective gloves on hand.

You should also purchase some rubber weather stripping, which is available at home improvement stores. Lay the weather stripping along the bottom edge of the bottom panel, positioning it carefully so that it aligns with the doorway frame. Next, install cable brackets along the bottom of the panel, which will later connect to lifting cables that help raise and lower the door. Secure the brackets with lag screws, making sure to leave them slightly loose so that you can adjust them later.

Wooden garage doors are a beautiful choice that adds natural warmth and character to your home. They’re made from a variety of wood species and finishes, so you can choose the one that best suits your architectural style. They’re also great insulators, which helps save energy and can help cut your utility bills. They’re also durable and long-lasting, retaining their beauty for years to come.

Installation

The installation process of a new garage door is a highly advanced project and requires specialized tools and expertise. It’s essential that your garage door be installed correctly by a trained professional, since incorrect installation can lead to serious injury or property damage. It can also void your warranty.

Before the installation begins, a technician will visit your home to perform a pre-installation inspection. This allows them to evaluate the worksite and ensure that your door will fit properly. Then, they’ll remove the existing garage door and dispose of it safely and efficiently.

Once the site is prepared, the technicians will begin installing the panels. They will start with the bottom panel, which is placed exterior-side down on a workbench or sawhorse. Then, they’ll secure the brackets to the bottom of the panel using lag screws. Next, they’ll install the bottom rail on the joists and mount the power unit (at the front of the carriage tube).

The other door panels will be stacked over the lower panel and secured to each other with hinges and screws. The installers will then finish the door by installing the trim, roller track, and cable guides. Finally, they’ll install the safety system, which usually consists of sensors that detect objects in the door’s path and reverse the movement of the opener.

Maintenance

The components of a garage door undergo significant wear and tear. Often, they require careful maintenance to ensure the garage door remains functional. For example, springs and cables experience immense tension, requiring careful inspection to ensure they aren’t frayed or damaged. Moreover, older doors may use extension springs to counterbalance the weight of the door, which can cause them to snap. If this happens, it may lead to serious safety hazards. Consequently, it’s essential to check for broken parts and replace them as soon as possible.

Performing regular garage door maintenance is the best way to ensure your investment in a new system lasts for decades. It’s a good idea to apply lubricant every six months and test the balance of your garage door annually. Additionally, it’s a good idea to inspect the weatherstripping to make sure it isn’t ripped or damaged. This can impact the temperature of your garage and allow pests inside.

Garage door installation is a complex procedure that requires absolute precision and accuracy. Attempting to align the track without proper training could result in injuries, property damage, and costly repairs. For this reason, you should always trust a professional to perform the task. In addition, a professional will install a motor in the ceiling to power your garage door’s opener. They will also install infrared sensors to prevent people or objects from getting stuck under the door.

Posted in Uncategorized | Comments Off on What You Need For Garage Door Installation